Download the Story Theme from your member area, upload the .zip file to Shopify, check the preview, then publish it with no risk to your store.
Updated 17 November 20264 min read
Installing the Story Theme takes three steps: you download the theme file from your member area, upload it to Shopify, then register your store to activate the license. Allow about ten minutes.
Download the theme
Log in to your member area and open Install in the sidebar (Story Theme section).
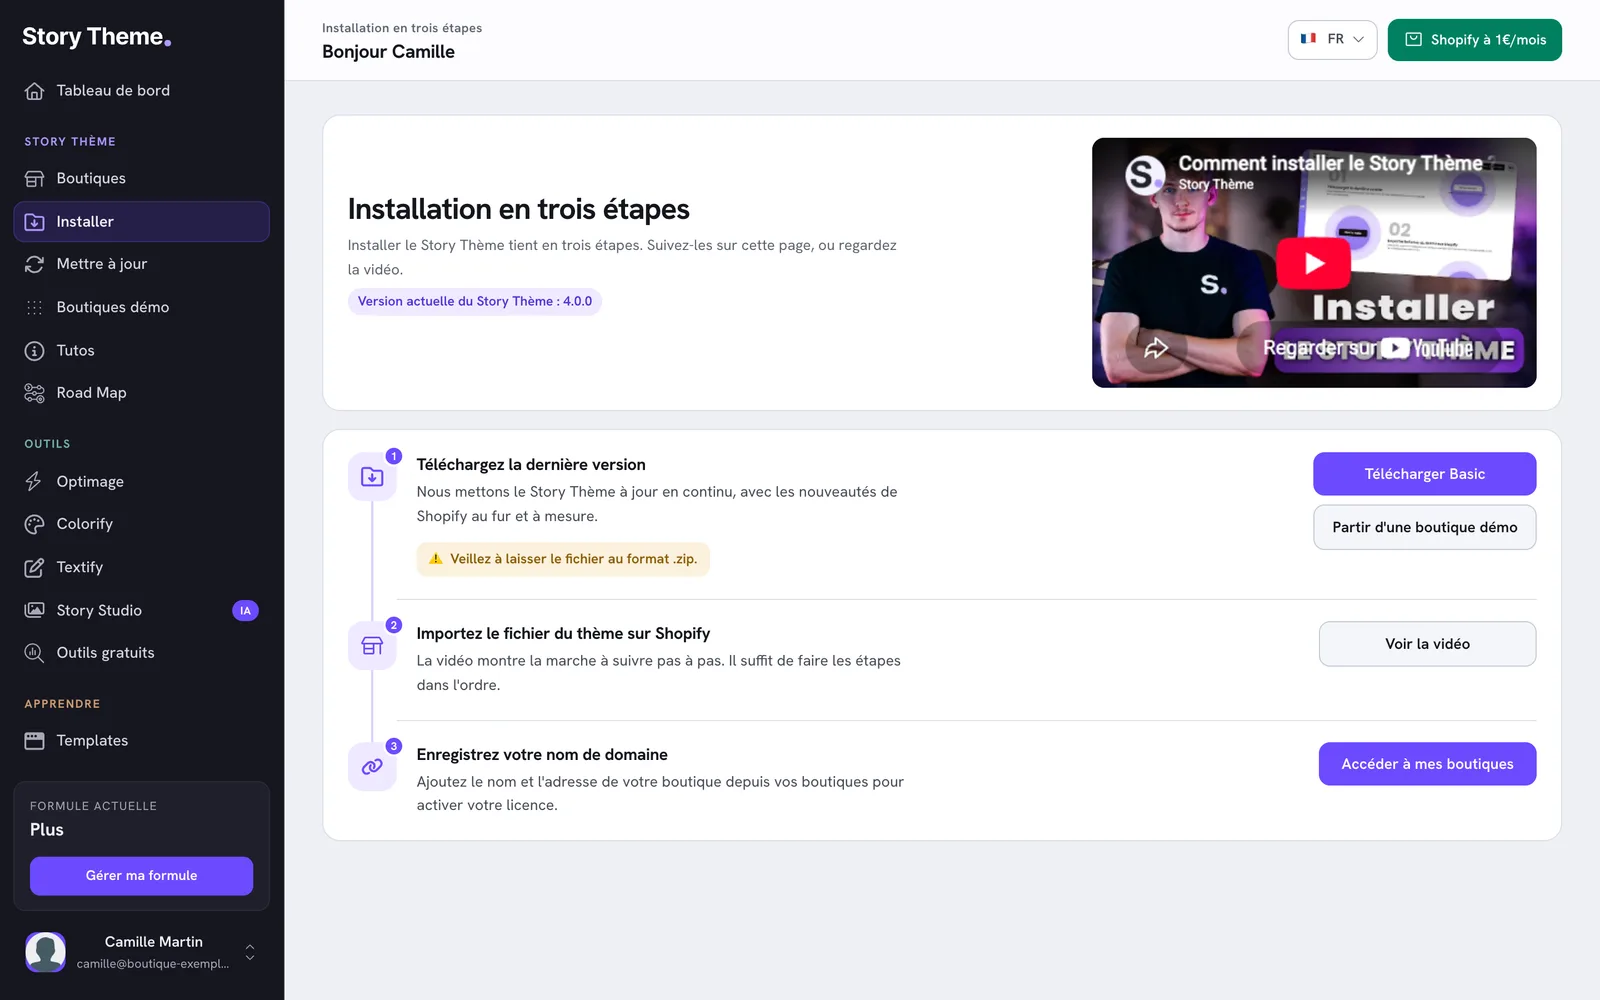
In the Download the latest version step, click Download Basic.
The file lands in your downloads as Basic followed by the version number, for example Basic 4.0.0.zip. The download can take a few seconds.
The Install page in the member area, with the current theme version and the three installation steps
Basic is the bare theme: every section and feature, with no prebuilt layout. If you'd rather start from a store that's already built, click Start from a demo store instead: the rest of the installation is the same. See Start from a demo store.
Upload the file to Shopify
In your Shopify admin, open Online Store > Themes.
In the Draft themes section, click Import theme, then Upload zip file.
Click Choose File, select the Basic 4.0.0.zip file you just downloaded, then click Upload.
Wait while Shopify processes the file. The Story Theme then appears in your draft themes.
Screenshot to take — Shopify admin > Online Store > Themes: "Draft themes" section, "Import theme" button clicked, menu open showing "Upload zip file"Screenshot to take — Shopify admin > Online Store > Themes: "Draft themes" section with the freshly uploaded Story Theme (Basic 4.0.0), "Edit theme", "Publish" and "…" buttons visible, live theme above
The uploaded theme is not published: your visitors still see your current theme. So you can set it up at your own pace.
Activate the license
Before customizing the theme, register your store in your member area. Without this step, the theme blocks add to cart and shows a message asking you to activate your license.
Go back to the Install page in your member area.
In the Register your domain name step, click Go to my shops.
Add your store with its exact address.
Step 3 of the Install page: Register your domain name, with the Go to my shops button
Open the theme preview to browse it like a visitor: home page, product page, cart.
When you're happy with everything, click Publish. The Story Theme becomes the theme your customers see.
Screenshot to take — Shopify admin > Online Store > Themes: "Draft themes" section, unpublished Story Theme with the "Publish" button highlighted, and the publish confirmation window open
You already have a live theme
Uploading the Story Theme doesn't touch anything: your current theme stays published until you publish the new one. Your products, collections, pages and orders belong to Shopify, not the theme: you'll find them exactly as they were.
However, the layout (home page sections, banners, text placed in the old theme) doesn't carry over. Set up the Story Theme in preview, then publish it when it's ready. Keep the old theme in your draft themes: if needed, you can republish it in one click.
This translation is provided for information only: in the event of any discrepancy, the French version prevails.
Legal Information
LEGAL NOTICE
In accordance with Articles 1-1 and 19 of French Law No. 2004-575 of 21 June 2004 on confidence in the digital economy (LCEN), users of the website story-theme.com are informed of the following.
1. Publisher and host of the website:
The website story-theme.com is published by NS GROUP, a French simplified joint-stock company (SAS) with a share capital of €500, which is its exclusive owner.
Registered office: 66 avenue des Champs-Élysées, 75008 Paris, France Registration: RCS Paris 903 894 467 (Paris Trade and Companies Register) SIREN: 903 894 467 – SIRET of the registered office: 903 894 467 00021 Intra-EU VAT number: FR10903894467 Email: [email protected]
Publication director: Théo Jehle, President of NS GROUP To contact the publication director: [email protected] Website design and development (webmaster): NS GROUP
Website host: Heroku, a platform operated by Salesforce, Inc., Salesforce Tower, 415 Mission Street, 3rd Floor, San Francisco, CA 94105, United States. Phone: +1 800 664 9073. Website: www.heroku.com. Servers located in the United States.
Data hosting: – database: MongoDB Atlas, a service of MongoDB, Inc., 1633 Broadway, 38th Floor, New York, NY 10019, United States (servers located in the United States); – files: Amazon Web Services (Amazon S3), Amazon Web Services EMEA SARL, 38 avenue John F. Kennedy, L-1855 Luxembourg (servers located in Frankfurt, Germany).
2. Introduction:
Any internet user who connects to and uses the website story-theme.com is considered a user of the website. The website story-theme.com offers several services, as is, made available to users. Users must act honestly and in good faith towards other users and towards the webmaster of story-theme.com. The website story-theme.com is regularly updated by NS GROUP. NS GROUP strives to provide information on story-theme.com that is as accurate as possible (subject to change), but cannot guarantee the accuracy or completeness of the information published on its website, whether or not it originates from NS GROUP. Consequently, users acknowledge that they use this information under their sole responsibility.
3. Website availability:
The website story-theme.com is in principle accessible to users 24 hours a day, 7 days a week, except in the event of an interruption, scheduled or not, for maintenance purposes or in the event of force majeure. If the service cannot be accessed, story-theme.com will do its utmost to restore access to the website and will endeavour to inform users in advance of the dates and times of the interruption. As it is bound only by an obligation of means, story-theme.com cannot be held liable for any inconvenience, whatever its nature.
4. Intellectual property:
NS GROUP is the exclusive owner of all intellectual property rights, or holds the rights of use, in all elements accessible on the website, including its structure, texts, graphics, logos, sounds, software, etc. Any reproduction, representation, modification, publication, update or adaptation, in whole or in part, of the website story-theme.com or of any of its elements, by any means or process whatsoever, is prohibited without the prior written authorisation of NS GROUP, to be requested at [email protected]. Failing this, it will be considered an infringement (contrefaçon) and may be prosecuted under Articles L. 335-2 et seq. of the French Intellectual Property Code.
5. Hyperlinks and cookies:
The website story-theme.com contains hyperlinks to other websites (partners, sources, etc.), set up with the authorisation of NS GROUP. However, NS GROUP cannot verify the content of the websites thus visited and therefore declines all liability for any risk of unlawful content. Users are informed that, when they visit story-theme.com, one or more cookies may be placed on their device through their browser. A cookie is a small file that records information about the user's browsing on the website. Browser settings allow users to be notified of the presence of cookies and, if they wish, to refuse them. Users may at any time configure their browser to refuse cookies, bearing in mind that refusing them may prevent access to certain services. To block cookies, search for "block cookies" in a search engine and follow the instructions for your browser.
6. Protection of persons and property – Personal data management:
In France, personal data is protected in particular by Regulation (EU) 2016/679 of 27 April 2016 (GDPR) and by amended French Law No. 78-17 of 6 January 1978 on information technology, data files and civil liberties.
On story-theme.com, NS GROUP collects personal information about users only as needed for the various services offered by the website. Users provide this information knowingly, in particular when they enter it themselves. They are then told whether providing this information is mandatory or optional. In accordance with the GDPR and Law No. 78-17 of 6 January 1978, every user has the right to access, rectify, erase, restrict, port and object to the processing of their personal data. To exercise these rights, send your request by email to [email protected] or by signed letter to the registered office of NS GROUP, stating the address to which the reply should be sent. If there is reasonable doubt about your identity, proof of identity may be requested. You may also lodge a complaint with the CNIL, the French data protection authority (www.cnil.fr).
No personal information about users of story-theme.com is published without their knowledge, nor exchanged, assigned or sold to third parties, on any medium whatsoever, apart from the technical service providers acting on behalf of NS GROUP (hosting, payment, email delivery). Only in the event of the sale of the website story-theme.com and its rights could this information be passed on to the potential buyer, who would in turn be bound by the same obligations of storage and modification of data with regard to users of story-theme.com.
Databases are protected by the French Law of 1 July 1998 transposing Directive 96/9/EC of 11 March 1996 on the legal protection of databases.
This translation is provided for information only: in the event of any discrepancy, the French version prevails.
GENERAL TERMS AND CONDITIONS OF SALE AND USE OF STORY THEME
----
ARTICLE 1 – PURPOSE
These General Terms and Conditions of Sale and Use (hereinafter "GTCU") define the contractual terms governing the use of the Shopify theme named "Story Theme" offered by NS GROUP through a monthly or annual subscription.
ARTICLE 2 – ACCEPTANCE OF TERMS
By subscribing to the Service, the user explicitly and unconditionally accepts all these GTCU.
ARTICLE 3 – SUBSCRIPTION TERMS
The subscription to the Service can be taken out for a monthly or annual period, with automatic renewal at each due date.
A 7-day free trial period is offered to every new user. This period can be extended at NS GROUP's discretion or by using a specific promotional code.
ARTICLE 4 – PRICING AND PAYMENT TERMS
Subscription prices are clearly indicated on the website in euros (€), including all taxes (VAT included). NS GROUP reserves the right to modify these prices with a reasonable notice of 30 days.
ARTICLE 5 – RENEWAL AND TERMINATION
The subscription is automatically renewed at each period (monthly or annual). Termination can be carried out without notice at any time through the user's member area. Deleting a Shopify store or domain name in the member area does not constitute a termination. Upon termination, the user retains access to services until the end of the current period, except in cases of refund for the last billing period.
ARTICLE 6 – NO RIGHT OF WITHDRAWAL
Pursuant to Article L221-28 of the French Consumer Code, the right of withdrawal does not apply to digital content immediately accessible after subscription.
ARTICLE 7 – REFUND POLICY
No refunds will be granted except in exceptional cases at NS GROUP’s discretion, particularly in cases of proven technical issues attributable to NS GROUP.
ARTICLE 8 – INTELLECTUAL PROPERTY
All elements relating to the "Story Theme" are protected by intellectual property rights exclusively owned by NS GROUP. Any unauthorized reproduction, modification, or use is strictly prohibited.
In particular, it is prohibited to bid on keywords containing the names "Story Thème", "Story Theme", "story-theme.com" or their variants, on Google Ads or any other advertising network, and to present oneself as the official Story Theme website. For members of the affiliate program, such use results in the suspension of the account and the cancellation of the commissions generated this way, including those not yet paid.
ARTICLE 9 – USER OBLIGATIONS
The user undertakes to provide accurate and up-to-date information, maintain account security, and use the Service in accordance with these GTCU.
ARTICLE 10 – AVAILABILITY AND MAINTENANCE
NS GROUP undertakes to ensure the availability of the Service, except in cases of force majeure, technical interruptions beyond its control, or scheduled maintenance operations.
ARTICLE 11 – LIMITATION OF LIABILITY
NS GROUP shall not be held responsible for indirect damages arising from the use of the Service or inability to access it.
ARTICLE 12 – PERSONAL DATA
NS GROUP processes personal data in compliance with applicable regulations, particularly GDPR. Users have the rights of access, rectification, deletion, and opposition, exercisable via [email protected].
ARTICLE 13 – COOKIES
The website uses cookies necessary for its proper operation, as well as statistical or performance cookies to improve the Service. Users can manage these preferences via their browser.
ARTICLE 14 – INDEMNIFICATION
The user agrees to indemnify NS GROUP, its affiliates, partners, directors, employees, and representatives against any claim or demand, including reasonable legal fees, arising from any violation of these GTCU or applicable laws.
ARTICLE 15 – SEVERABILITY
If any provision of these GTCU is deemed invalid or unenforceable by a competent court, such provision shall be severed without affecting the validity of other clauses.
ARTICLE 16 – TERMINATION OF CONDITIONS
Obligations prior to termination shall remain in force after termination. NS GROUP may terminate access to the Service without notice in case of a breach of these GTCU by the user, who remains liable for all amounts owed until the effective date of termination.
ARTICLE 17 – BANK DISPUTES
In the event of a banking dispute (chargeback, rejection, or payment dispute), services will be immediately suspended until the dispute is definitively resolved.
ARTICLE 18 – ENTIRE AGREEMENT
These GTCU constitute the entire agreement between NS GROUP and the user and replace all previous agreements relating to the Service.
ARTICLE 19 – MODIFICATION OF TERMS
NS GROUP reserves the right to modify these GTCU at any time, with prior notification to users. Continued use of the Service constitutes implicit acceptance of the modifications.
ARTICLE 20 – APPLICABLE LAW AND JURISDICTION
These GTCU are governed by French law. Any dispute will be submitted to the competent French courts after an attempt at amicable resolution.
ARTICLE 21 – CONTACT
For any questions regarding these GTCU, please contact us by email: [email protected].